If you are one who wants your android app to scale massively without worrying about loosing sleep over database & server issues (and a host of other ailments that come from staying up too late worrying), hooking it app with an App engine backend is a smart thing to do. It let’s you focus on code.

Google has two great tutorials (here and here) on how to get the full monty up and running. The aim here is to fill in the bits they left unspoken and hopefully save you the hours of hair-pulling a friend of mine had to go through. By “friend” I’m not referring to myself-true story.
1. For your first run, use an emulator. In the tutorials it might seem like a suggestion but going down the setting-it-up-on-your-handset rabbit hole isn’t very pretty. It isn’t helped by the fact that you are still trying to wrap your head around a few new concepts.
2. If you are feeling like a ninja and you insist on running the app on a handset, kudos to you. You very likely will have to change this:
LOCAL_APP_ENGINE_SERVER_URL_FOR_ANDROID = "http://10.0.2.2:8888";
This is in CloudEndpointsUtils.java
Why?
When running on an emulator, that line tells the emulator that the server is located at 10.0.2.2. That basically maps back to your localhost. Details here: http://developer.android.com/tools/devices/emulator.html#networkaddresses
So, if you are running your tests off a handset, whatever address you put there should map back to your localhost from your handset. This means the two [handset and localhost] should be on the same network. Wifi, LAN, whatever. Your server should also be set-up to accept connections from any host [and not only localhost, which is the default setting] To make things easier on yourself, if you must use your handset, set
protected static final boolean LOCAL_ANDROID_RUN = false;
This way, you are running off the remote app engine app instance. When you get comfortable, go get your PC and handset to talk.
Power Tip: To allow your localhost to receive connections from anywhere,in Eclipse: select the server project -> right click -> Run as -> Run Configurations. Select the Arguments pane and in Program Arguments, add --address=0.0.0.0 in front of the --port=8888.
3. 404 Error
The version your local code knows about should be the default version in the cloud. You might get the following error:
</p> <p style="text-align: justify;">02-08 18:34:59.990: E/com.kanzucode.android.test.GCMIntentService(27575): Exception received when attempting to register with server at https://test-app.appspot.com/_ah/api/ 02-08 18:34:59.990: E/com.kanzucode.android.test.GCMIntentService(27575): com.google.api.client.googleapis.json.GoogleJsonResponseException: 404 Not Found 02-08 18:34:59.990: E/com.kanzucode.android.test.GCMIntentService(27575): Not Found 02-08 18:34:59.990: E/com.kanzucode.android.test.GCMIntentService(27575): at com.google.api.client.googleapis.services.json.AbstractGoogleJsonClientRequest.newExceptionOnErr or(AbstractGoogleJsonClientRequest.java:113) 02-08 18:34:59.990: E/com.kanzucode.android.test.GCMIntentService(27575): at com.google.api.client.googleapis.services.json.AbstractGoogleJsonClientRequest.newExceptionOnErr or(AbstractGoogleJsonClientRequest.java:40)
Don’t sweat it. Go here https://appengine.google.com/deployment?app_id=s~your-project-id and make the version you’ve uploaded to be the default version
Why? Your app goes to app engine looking for http://1-dot-your-project-id.appspot.com (where 1 is the deployment version) but it doesn’t exist because your app is at http://current-default-version-your-project-id.appspot.com..hence the 404 eror
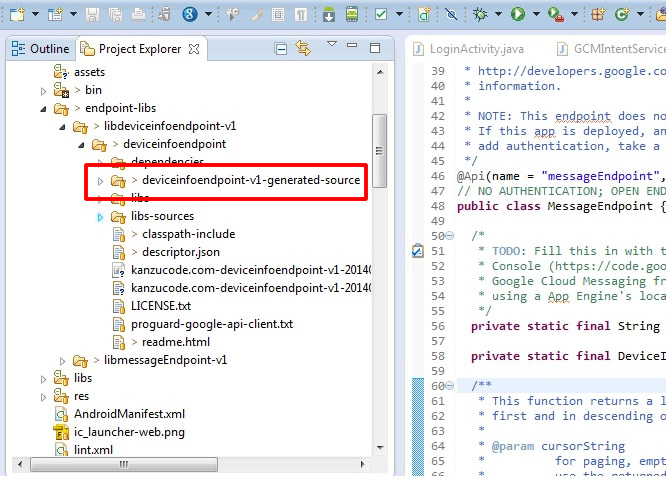
4. Generating Cloud Entity Backend not working/Build Path Source folders missing In Eclipse, this happens if the generated source files are not correctly added to your build path. To correct this, go to your client app > endpoint-libs>lib{classname}-v{versionNumber}>{classname}>{classname}-v{versionNumber}generatedsource Right click that folder, select Build Path and choose ‘Use as source folder’

Have you run into something different? Have you run into one of these and resolved it differently? Do share

Hi, Im having trouble with appengine – you’re point “404 Error”. Unfortunately your solution doesn’t solve my problem. I am still getting the 404 error. Have you come across any other ways to solve this issue?
Hi No one, I’ve run into the issue a number of times and each time, it has come down to changing the default app to what I’m currently testing. Sorry if this doesn’t solve your issue.
Hi Kakoma,
Thank you so much for your solution!!
This solved my 404 Error!!
Hi Rogier,
Very glad it helped someone; after No one’s comment, was starting to wonder. Thanks for the re-assurance